One of the new features in the upcoming TopBraid 3.5 release is called SPINMap.
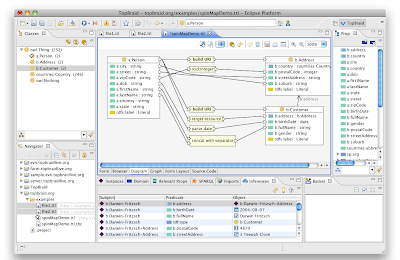
SPINMap is a SPARQL-based language to represent mappings between RDF/OWL ontologies. These mappings can be used to transform instances of source classes into instances of target classes. This is a very common requirement to create Linked Data, for example starting with spreadsheets, XML files or databases, but also from one domain-specific ontology into a more generic one. As a first impression, here is a picture of SPINMap in action:
If you would like to learn about this with a visual demo, please take a look at the
In the rest of this blog entry I will cover similar content to the video, but with screenshots and prose.
Introduction to SPINMap
SPARQL is a rich language that can be used for many purposes. The SPARQL CONSTRUCT keyword is particularly useful to define rules that map from one graph pattern (in the WHERE clause) to another graph pattern. This makes it possible to define sophisticated rules that map instances from one class to instances of another one.
The
SPIN framework provides several mechanisms that make the definition of such SPARQL-based mapping rules easier. In particular, SPIN makes it easy to associate mapping rules with classes, and SPIN templates and functions can be exploited to define reusable building blocks for typical modeling patterns.
The SPINMap vocabulary (http://spinrdf.org/spinmap) is a collection of reusable design patterns that reflects typical best practices in ontology mapping. SPINMap models can be executed in conjunction with other SPARQL rules with any SPIN engine. The main advantage of SPINMap is that it provides a higher-level language that is suitable to be edited graphically. TopBraid Composer 3.5 provides a visual editor that makes it easy to establish ontology mappings using drag and drop, and filling in forms.
It is a good practice to store the ontology mapping rules in files separate from the source and target files. The mapping file only needs to import the SPINMap namespace (which in turn imports SPIN etc). The easiest way to get started is to use File > New > RDF/OWL/SPIN File... and then to activate the check box for "SPINMap Ontology Mapping Vocabulary", as shown below.
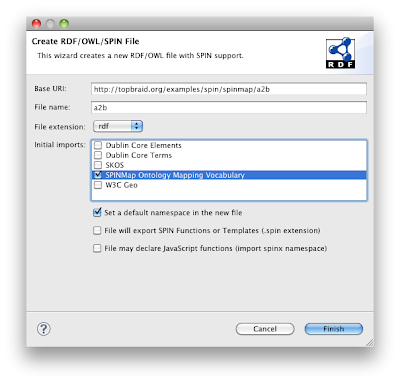
This will create an empty file importing http://topbraid.org/spin/spinmapl. As a next step, you should drag the source and target ontologies into the Imports view so that those get imported into the mapping ontology. Then select the class you want to start mapping, and switch to the Diagram tab. In the example below, the source ontology A defines a class a:Person, and we want to map it into the target class b:Customer.
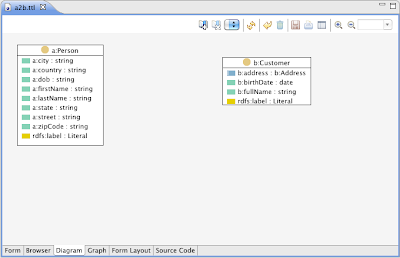
Use drag and drop (e.g. from the Classes view) to add other classes to the Diagram. If the SPINMap namespace is present, the Diagram will provide additional capabilities and use a different layout algorithm than usual. If you move the mouse over a class, a triangular anchor point will appear in the upper right corner of the class box. It will turn green if you move the mouse over it, and if it can be made the source of a mapping. Click on this and keep the mouse button pressed to establish a link to another class. Move the mouse over the incoming upper anchor of the target class and release the mouse. A dialog like the one below will appear.
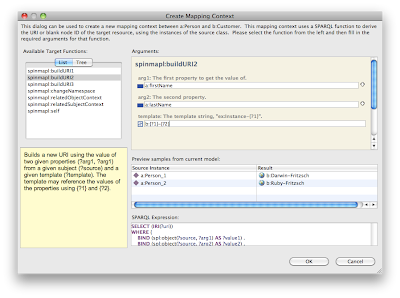
This dialog is used to create a "mapping context" that is later used to determine how the target instances shall be selected from the source instances. In particular this is used to construct URIs from the values of a given resource, e.g. so that a:Instance-0-1 is turned into b:John-Smith. The dialog provides a collection of target functions that can be used for that purpose. You simply need to pick an appropriate function and fill in the blanks to establish a mapping context. In the example screenshot, a new URI is constructed from the values of the source properties a:firstName and a:lastName and a provided URI template. This assumes that those properties together serve as unique identifiers, similar to primary keys in a database. Other algorithms can be created if needed through SPIN functions.
As soon as you have filled in all required arguments of the mapping context function, the preview panel of the dialog will give you an idea of how the resulting values will look like. When you are happy with this, press OK.
The resulting context will be displayed with a yellow graph node as shown below.
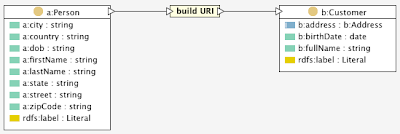
If you ever need to edit this context node again, e.g. to change the URI template, just double-click on it. Right-clicking the node opens a context menu with an option to delete it.
Once a context has been established between two classes, the user interface makes it possible to add transformations. In the example above, the source class has a property a:dob that holds date of birth values as raw strings, such as "30/04/1985". We want to map this into the target property b:birthDate, which is a well-formed xsd:date in the format "1985-04-30". TopBraid's SPARQL library provides a built-in function spif:parseDate to make this task easier. Use the mouse to draw a connection from a:dob to b:birthDate. A dialog such as the following will appear.
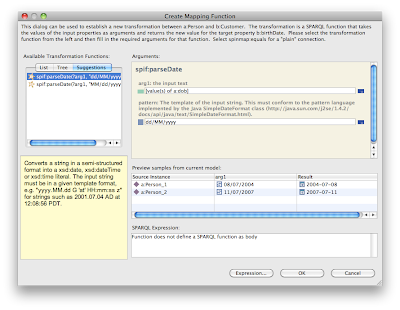
In this dialog you can either manually select a transformation function, or check if the system has any suggestions for you, on the Suggestions tab. In this case, the system suggests spif:parseDate with pre-defined patterns to convert raw dates into valid xsd:date literals. Pressing OK, this creates a mapping transformation as shown below.
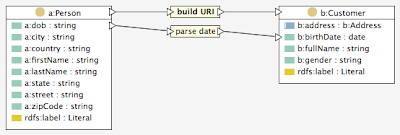
At any point in time, TopBraid Composer makes it easy to try the mapping out. Assuming TopSPIN is the selected inference engine, just press the Run Inferences button in the main tool bar to see the results.

As you can see above, each instance of the a:Person class has been mapped into a corresponding instance of b:Customer. The URI of the target resources has been generated using the string insertion template based on first name and last name. Furthermore, proper birth dates have been generated from the raw source strings. The context menu of the Inferences view provides options to assert the resulting RDF triples if desired, or you can use the Triples View to move them elsewhere.
It is possible to add any number of other transformations in similar ways. Some transformations take more than one argument. In that case, additional input anchor points will be displayed, as shown for the node "concat with separator" below.
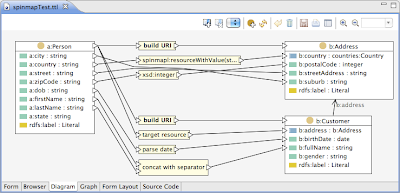
Note that a complex example like above uses a number of different design patterns. Some additional of those patterns are explained in the
tutorial video, that I would strongly recommend if you want to save time with this technology.
Understanding and Extending SPINMap
The mini tutorial above might be enough for many users to get started. For advanced users with knowledge of SPIN, the following background may be helpful to understand how SPINMap works, and how it can be extended.
SPINMap is an entirely declarative application of SPIN. This means you can explore the mappings generated by the visual editor from an RDF perspective, e.g. using TBC forms. In the example above, the form for a:Person displays a collection of SPIN Template calls:

You can drill into the templates by opening up the + sign that appears when you hover the mouse over the template icon.
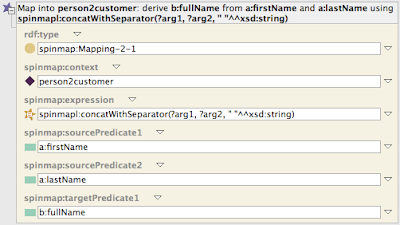
The example above illustrates that SPINMap is based on a (small) collection of generic templates, such as spinmap:Mapping-2-1 which represents a mapping from 2 source properties into 1 target property. Each of those templates a linked to a spinmap:Context which is used at execution time to determine the target URIs. Furthermore, the argument spinmap:expression points to a SPARQL expression, SELECT or ASK query, or even a constant URI or literal that is used to compute the target value from the source value(s). The SPINMap templates are using the function spin:evalto evaluate those expressions at execution time. When executed, the expression will be invoked with pre-assigned values for ?arg1, ?arg2 etc, based on the current values of spinmap:sourcePredicate1 on the source instances.
Since in practice any SPARQL function can be used as spinmap:expression, users can also add their own SPIN functions where appropriate. It is also possible to use the built-in SPARQL functions such as xsd:string().
The mapping context uses a similar mechanism, also based on spin:eval to create target URIs. You can open any instance of spinmap:Context to see how this is done.
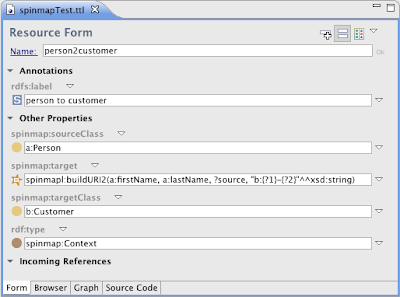
In the example above, the target function spinmapl:buildURI2 is used to derive a new URI from two input properties and a template. You are free to define your own target functions there, as long as they are instances of spinmap:TargetFunction (and subclass of spinmap:TargetFunctions).
If you are writing your own functions, or want to make the system smarter, you can add your own spinmap:suggestionXY values to the functions. These are SPARQL CONSTRUCT queries that may construct zero or more instances of the function, with partially filled in fields, as well as a spinmap:suggestionScore. See the function spif:parseDate for an example of what can be done with this mechanism.
 TopBraid's faceted search is implemented by a collection of TopBraid Live servlets and a JavaScript UI library. What you see on the screen above is in fact a web browser embedded into TopBraid Composer. The default stylesheet is simple and can be customized, and it's also possible to use the same JavaScript library in completely different web applications.
 The faceted search component looks for visualizations marked with ui:id="facetSummary", and will display them as shown below.
 Further customizations are possible without any programming: For example you can specify which properties shall be visible by default, and which properties shall not be selectable as facets.


